Pixel Mapping Videos + Still Images + Effects

Use Your Lighting Fixtures As An Extended Pixel Matrix

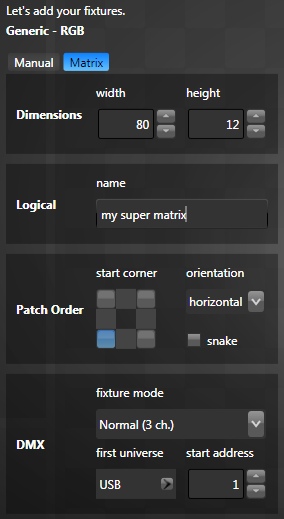
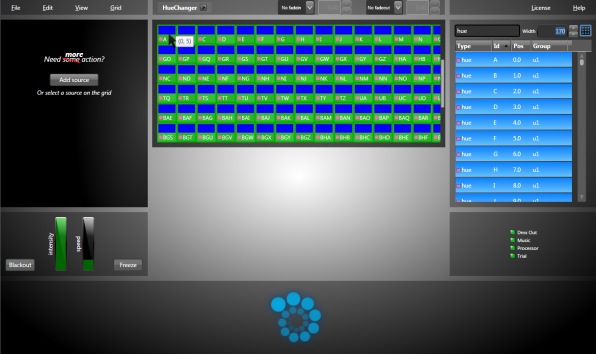
Lightjams allows you to map videos, still images and live effects on your lighting fixtures as if they were part of a large matrix. The most common usage is to display content on a RGB LED wall. You can go further and map any lighting fixture attributes, including dimmer, iris, pan and tilt.

Here's a video of a night club with plenty of LEDs, moving heads and other fixtures. Everything is controlled via Lightjams using live music analysis and MIDI keyboards! This is the work of the very talented Sébastien Atoch from Quadbyte .


An immersive 3D environment by LightRiders in LA. Lightjams controls 45 tubes of 68 LEDs each (over 3000 LEDs). 3D effects are created by cleverly splitting the installation into multiple 2D grids and syning them in multiple ways.


A 6x6 matrix of RGBW fixtures made by Darklight and controlled via Lightjams. You can see how Lightjams makes full use of the white leds and creates very smooth transitions between all colors.


Many thanks to Drew Sewell and Douglas Heriot for this great video of Lightjams in action! Over 24 universes of pixel mapping and a few more universes for moving heads, strobes, lasers... Everything controlled LIVE via multiple midi controllers! Awesome!

GEAR LIST: custom built LED panels with 4050 RGB Pixels, 6 Led stage par cans, 9 Ehrgeiz fusion bars each with 60 ch, 4 blinders, 1 1500w strobe, 4 diode green lasers, 6 Mac250 Movers.
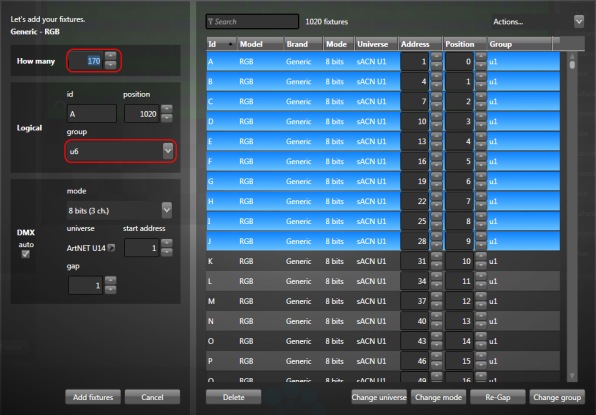
 

Here's a low resolution pixel mapping project designed by Oliver Kulpsoo. A wall full of parcans with a smooth effect running on it and live control via a Behringer BCF2000.

256 DMX universes

Enough for 43520 RGB LEDs when using all ArtNET and sACN E1.31 outputs. More about ArtNET and sACN. As the led controller taking sACN E1.31 input, you can find many affordable options.

Integrated Media Server

Lightjams acts as both a powerful media server and a lighting controller. Unlike many other pixel mapping solutions requiring multiple complex software, Lightjams is all you need to generate and map the content. Just select your media files from your hard drive and you're ready to go! I'm giving you these video loops to get started. See more info about the media server.

Lightjams as a media server

Native Spout Support

Use live videos generated by other apps like Resolume, Ableton Live, Processing, Max/Msp, TouchDesigner, Cinder, OpenFramework, VVVV, Isadora, After Effects, Mapio, Unity3D and more. See Spout for more details.

Lightjams supports Spout for live video input

Native NewTek NDI Support

Receive video over the network and use it for pixel mapping. See NDI for more details.

Extensive Color Format Support

Fully compatible with RGB (all permutations of red, green and blue), RGBW, RGBA, RGBAW/RGBWA and white.

Interactive Triggers

You can use any live inputs, ranging from a MIDI keyboard to an iPad to generate and trigger your effects in realtime. For example: It's really easy to trigger your videos from another lighting console.

Transform Your Content

Easily change color, intensity and saturation. For example: You can make all your videos black and white or you can force them to appear a certain color. This is a great way to ensure some consistency across all your media. The video playback speed is also fully adjustable.

Asymmetric/Irregular Matrix

Tired of perfect rectangle screens? Lightjams lets you create unique mappings with the shapes you want.

Low Res Content

Lightjams embraces the low resolution aesthetic and empowers users to create great content where every pixel counts.

Walkthrough

I'm giving you these video loops to get started. Pixel mapping implies working with a lot of fixtures, mostly RGB fixtures. Lightjams has specific features to simplify this work.

Easy Matrix Patching

A real time saver! You can patch a matrix of fixtures in a few clicks. The corresponding grids are automatically created for you, letting you start building effects in a few seconds.

Dimensions: Enter the width(x) and height(y) of your matrix.

Name: Give your matrix a nice name to be able to quickly find it later.

Patch Order: Specify the corner of your matrix corresponding to the first fixture. Then you can patch by going horizontally or vertically from the start corner. The snake option allows you to patch creating a zigzag pattern instead of straight lines.

DMX: Select the universe of the first fixture. Lightjams automatically continues patching on the following universes if needed.

Easy patch matrix of dmx fixtures

Custom Patching

How many: You can patch all your fixtures at once.

Group: Tag your fixtures by typing a few words in order to be able to quickly select them later.

List Multi Selection: Once patched, you can select many fixtures in the list at once to do batch modifications. To filter your selection, you can type keywords in the search box. For example: Group names, universe name (U1, U2...), fixture model...

Fast DMX Fixture Patching

Attributes Selection

Back in the main interface, now it's time to put the fixture attributes on the grid.


List Multi Selection: You can select all attributes at once by pressing CTRL+A. Then you can remove attributes by clicking the item while holding CTRL.

List Sorting: The attributes are added to the grid in the same order as they appear in the list. So if you want to add them in the reverse order, simply sort them in reverse by clicking the column header.

Search Box: To filter the attributes in the list, type some keywords in this box. For example: If you want to see only the hue attributes, simply type hue in the box. If you want to see all hue attributes part of a specific group, type both words one after another like this: hue group1.

Paste Array Mode: The little grid button at the left is to enable the array mode. You enter your array width and Lightjams will put the selected attributes on the grid by adding "line break" when reaching the specified width.

Quickly adding DMX attributes

Paste Attributes

When the array mode is activated, you can add all selected attributes to the grid in one click by clicking the top-left corner of your future array.

In the image to the right, 1020 hue attributes (6 universes) have been added by clicking the first grid cell (top-left).

Flip/Mirror/Randomize: To quickly reorder the attributes once added to the grid, select them and go in the Edit/Attributes menu.

Reuse Attribute Layouts: Once you've created your layout with, for example, the hue attributes, you can duplicate your grid and use the Replace By List Selection of the Edit/Attributes menu to quickly replace all hue attributes by another type. This avoids needing to redo the work for hue/saturation/intensity.

Quickly adding DMX attributes

What's next? Try Lightjams for free!

©2009-2023 Lightjams inc. All Rights Reserved - The DMX Lighting Controller Software for Live Performances. Proudly made in Montreal, Canada.